The Manage tab — teams, student PCs, records and servers
The Manage tab gathers the preparation and checks you do before and after a lesson — organising teams, student PC names and settings, hardware and software inventory, records, and SmartWorkStation server management.
8.1 Organising teams
Use this when you want to gather students into teams and teach group by group.
| Feature | Description |
|---|---|
| Manage groups | Add groups, set their name and colour, or delete them. |
| Selection → group | Assigns the currently selected students to a group in one go. |
| Clear groups | Returns every student to “unassigned” (the groups themselves remain). |
| Manage clients | Shows the full student list, where you can change team and name, remove entries from the list, and export. |
Once you have groups, the All / group tabs above the ribbon narrow the view so the grid shows just one team.
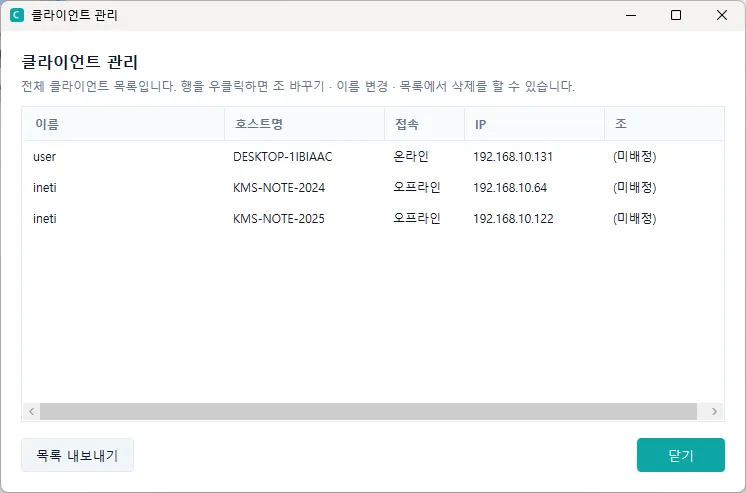
8.2 Rename
Puts a name prompt on the selected student PCs so each student types in their own name (or nickname). What they type becomes the display name on their card in the console.
This changes only the display name shown in the console. To change the Windows computer name of the PC itself, use 8.3 “Rename computer”.
![The name prompt shown on a student PC — the student types a name and presses [OK] (it closes by itself after a while)](/_astro/fig38.Dml4qNLk_Z5iYeu.webp)
8.3 Rename computer
Right-click a student card → Rename computer changes the Windows computer name of that PC remotely. Once you enter a name and confirm, the student PC reboots immediately and reconnects under the new name. The card’s display name, group and seat position carry over.
- When to use it — PCs installed from a cloned image often share the same computer name (for example, all of them are
304-35). They then keep pushing each other off and the connection drops over and over. The console tells you “two or more PCs have the same name”; giving them different names with this menu fixes it. - Name rules — 1 to 15 characters, letters, digits and hyphens (-) only. A name cannot consist of digits alone.
- If the menu item is missing — this works only on Windows PCs with the client service installed. It does not appear for RDS (terminal server) sessions or for macOS, Android and Chromebook students.
- Caution — because the PC reboots, any unsaved student work is lost. PCs joined to a domain cannot be renamed, and the console says so. In diskless (no-HDD) classrooms the name is reassigned at every boot, so set it in the diskless management tool instead.
![The student card right-click menu — [Rename computer] near the bottom](/_astro/fig35.gHqUqX1f_5cery.webp)
![Rename computer — enter the new name and press [OK], and the student PC reboots](/_astro/fig36.BctFFdAQ_1EiJuR.webp)
8.4 PC Settings — removing lesson interruptions and shared settings
PC Settings on the Manage tab sets, in one place, the settings that apply to every PC in the class. Once saved they take effect immediately on connected students and are re-applied automatically to students who connect later (after a reboot, or the next day). PCs that reset at boot, as in a diskless classroom, receive the same settings the moment they connect. No reboot is needed.
| Setting | Description |
|---|---|
| Class mode | Suppresses sleep, display-off and the screen saver on student PCs, so a broadcast is not cut off by a screen going dark mid-lesson. Turning it off restores the original settings. |
| Set volume | Sets every PC’s volume to the same level (0–100%). |
| Windows Update active hours | Blocks automatic reboots caused by updates during the given hours (for example 8 to 18). On Home editions only part of this may apply. |
| Block Windows Update | Uses a policy to block automatic downloads and installs, and automatic restarts while a user is logged on. Unticking releases the policy. It may not apply on Home editions. |
| Sync clocks | Sets the student PC clocks to the teacher PC’s time. Works even in classrooms with no internet access. |
| Browser homepage | Build a list of addresses and Edge and Chrome open every address in the list as start pages, with the first entry becoming the Home button. The list is kept even when unticked, and is applied only while ticked. Unticking releases the pin. |
| Public desktop shortcuts | Add a name and a target to the list and the same shortcuts are created on every PC’s desktop. A web address makes a web shortcut; a program or folder path makes a shortcut to that. The list is kept even when unticked, and is synchronised only while ticked. Entries removed from the list are cleaned up on the PCs too; files students created themselves are left alone. |
An unticked item means “leave alone” — the student PC’s existing setting is kept as it is. For macOS and Android students only Class mode applies; the rest is ignored.
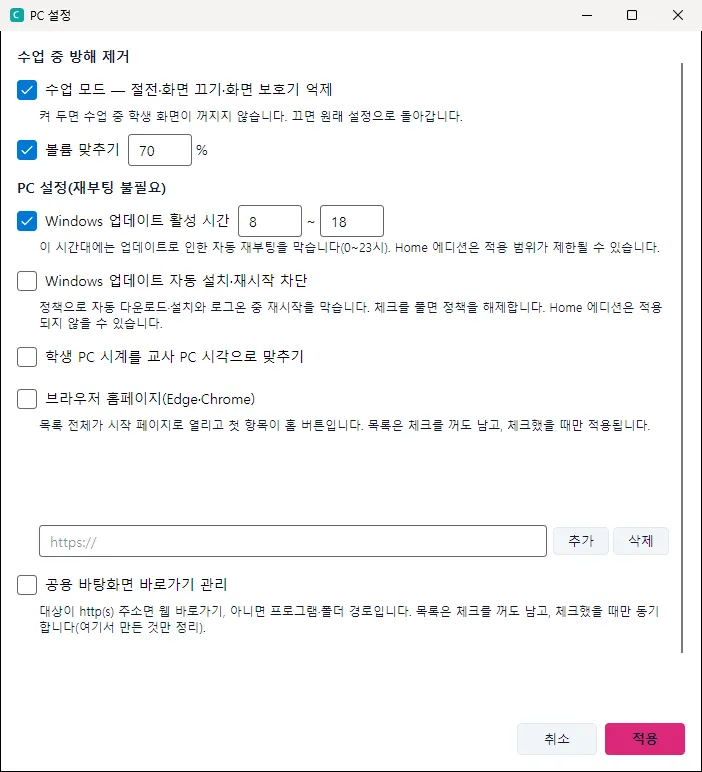
8.5 Inventory (hardware and software)
- Hardware inventory: reads the hardware and operating system details of student PCs.
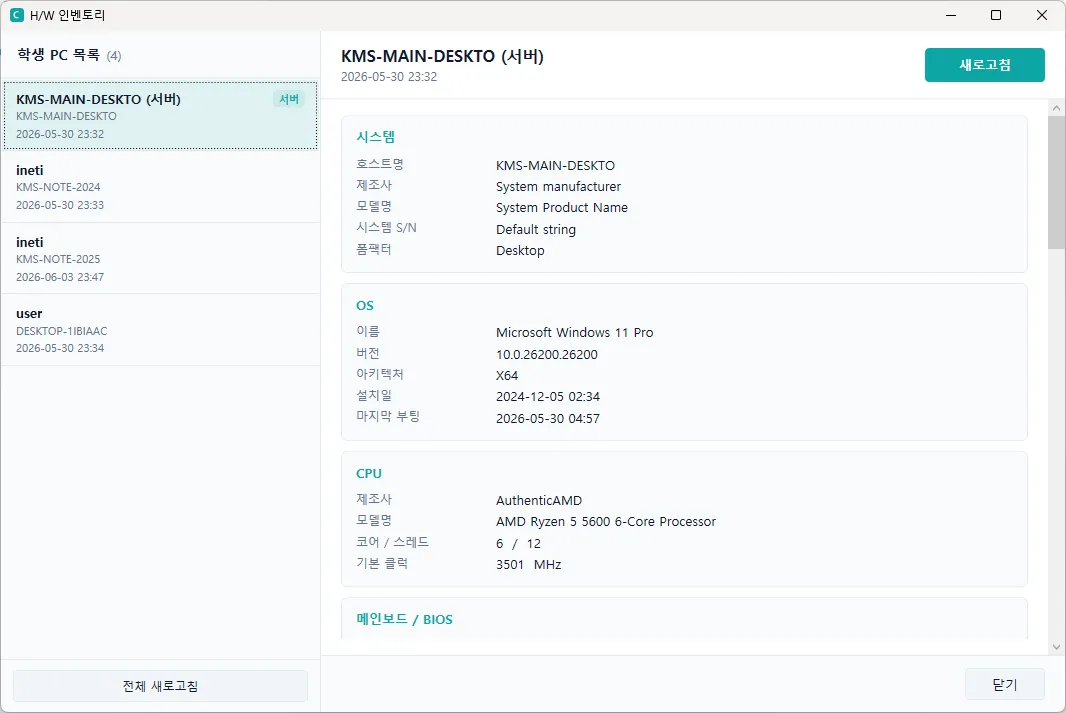
- Software inventory: lists the software installed on student PCs (removable programs plus Microsoft Store apps).
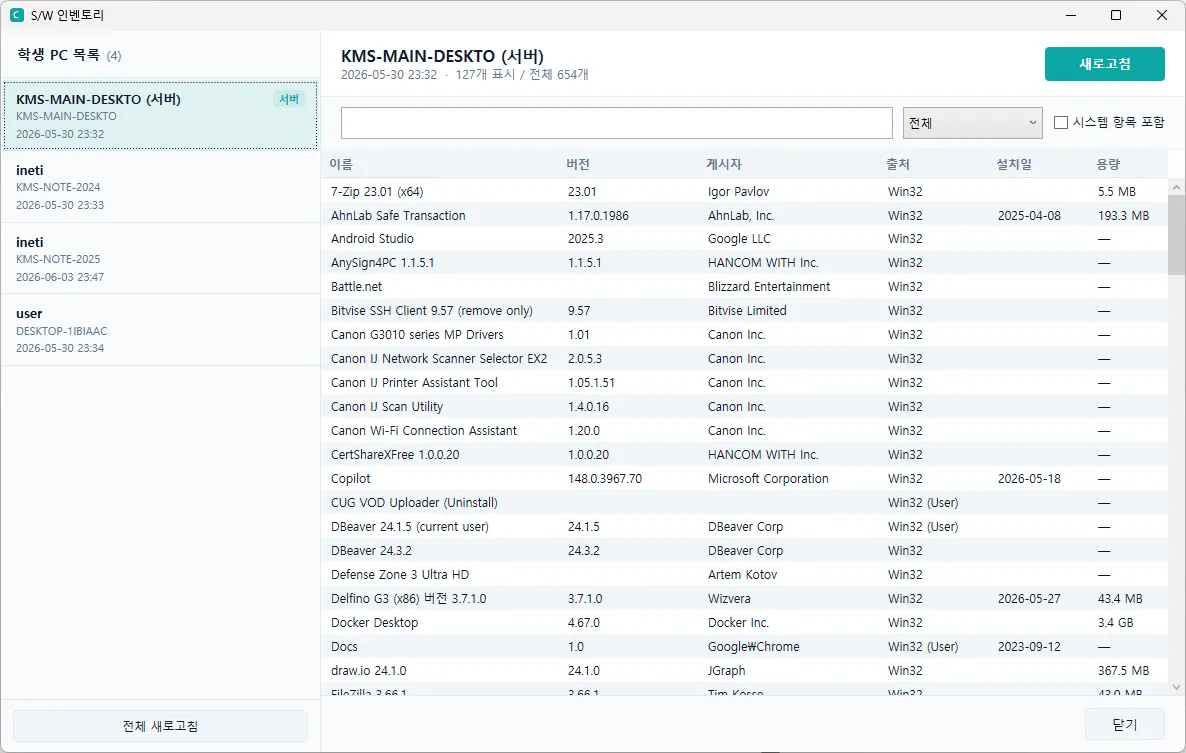
8.6 Notification history and Collect Logs
- Notification history — lets you look again at notifications that appeared briefly at the bottom of the screen and then disappeared. You can see when each one appeared, for what reason (Command failed · Not supported · Unstable connection · Duplicate identifier · Help request) and what it said. It shows up to the latest 500 notifications since the console was started, and they are cleared when the console closes.
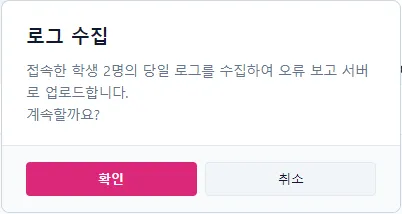
- Collect Logs — when a problem occurs, gathers the records needed to analyse the cause and sends them. It collects the day’s logs from the connected student PCs (Windows, macOS, Android) and the teacher console’s logs, uploads them to the error report server, and keeps a copy of the same content on the teacher PC (the completion notice shows where it is kept). If no students are connected, only the teacher console’s logs are collected. It helps most when you press it right after the problem happens.
8.7 SmartWorkStation management — server power, modes, remote connect and seat layout
The features in this section appear only in classrooms equipped with SmartWorkStation hardware (a server and terminals) and its dedicated product. In a classroom made up of ordinary PCs, neither the SmartWorkStation button nor the “SmartWorkStation performance” item in settings is shown — this is normal, not a fault.
If you use SmartWorkStation (a classroom where several terminals are connected to one server), a SmartWorkStation button appears in the Servers group at the right end of the Manage tab. A server is registered automatically once it has connected to the console even once; while no server is registered, the button is not shown.
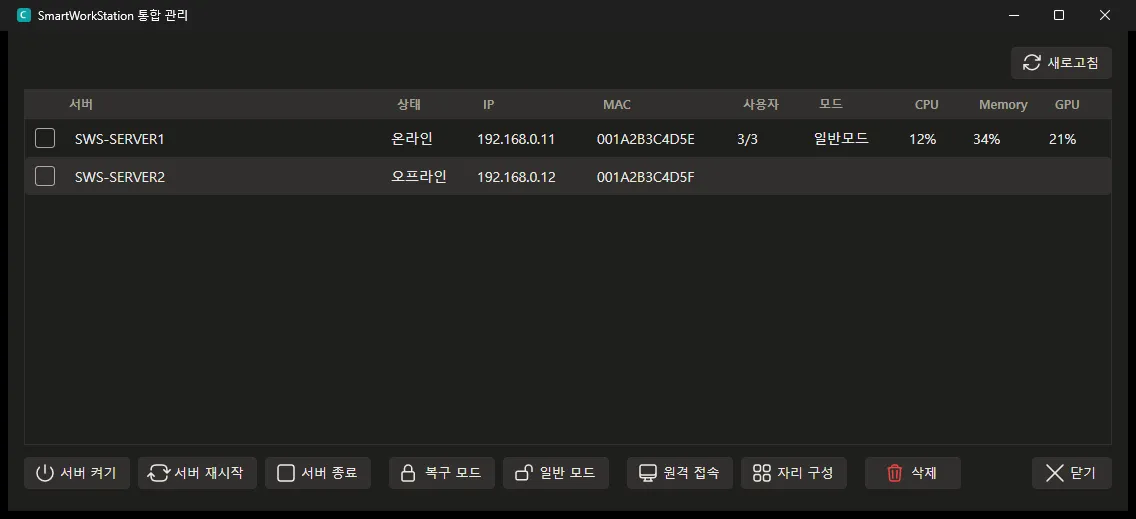
Server list
| Column | Contents |
|---|---|
| Server · State | The server name and whether it is online or offline. For an offline server only the IP and MAC remain and the other cells are empty. |
| IP · MAC | The server’s addresses. They are used for remote connect and for waking the server (WoL). |
| Users | Number of connected terminals / number of registered terminals (for example 3/3). |
| Mode | The disk protection state — Normal (changes are saved) · Recovery (changes disappear on reboot) · Not installed (the server has no disk protection program). |
| CPU · Memory · GPU | Usage for the server as a whole. It is refreshed about every 2 minutes, and pressing Refresh (F5) collects it again at once. Hover over the GPU cell to see the graphics card name. |
Action buttons
Tick the servers with the check boxes on the left, then press one of the buttons below. Restart, shut down, mode changes and delete ask for confirmation once more before they run.
| Button | What it does |
|---|---|
| Wake | Switches on a server that is off, over the network (WoL). The server must have connected at least once so that its MAC address is registered, and it needs a wired LAN and WoL enabled in the BIOS. |
| Restart OS · Shut Down OS | Restarts or shuts down the selected servers, forcibly, after 15 seconds. The work on every terminal connected to that server ends with it, so check first that the students have saved. |
| Recovery Mode | Turns disk protection on and restarts the server. Changes made afterwards (installed programs, saved files and so on) disappear on reboot — use it to keep the server in the same state for every lesson. |
| Normal Mode | Turns disk protection off and restarts the server. Changes made afterwards are saved to disk — use it for work that has to be kept, such as installing or updating programs. Switch back to Recovery Mode when you have finished. |
| Remote connect | Press it with exactly one server ticked, or double-click the row, to connect to the server’s screen through Remote Desktop. You enter a user name and password; with Save account info switched on, the fields are already filled in the next time you open it (it is stored encrypted so that it can be decrypted only on this PC under this Windows account, and is erased if you untick it and close). Connect to the admin session enters a management screen that does not take up a terminal seat. |
| Seat layout | Press it with exactly one server ticked to see that server’s configuration seat by seat (terminal by terminal). See “Viewing the seat layout” below. |
| Delete | Removes an offline server you no longer use from the list. The server itself is not affected, and it reappears in the list automatically if it connects again. Online servers cannot be deleted. |
Viewing the seat layout
Shows in one table, for each seat (terminal) connected to the server, which account is using it and whether the keyboard, mouse and terminal are properly attached. It is view-only and does not change the configuration. It is available only while the server is online, and it is collected afresh from the server each time you open the window (this takes a few seconds).
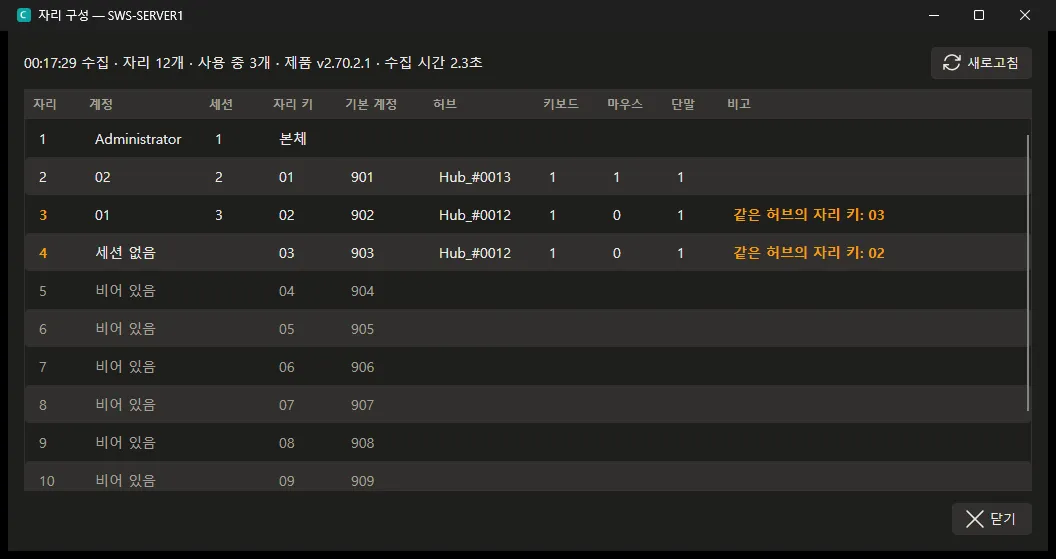
| Column | Contents |
|---|---|
| Seat | The seat number. Seat 1 is the screen of the server itself. |
| Account · Session | The account currently logged on at that seat and its session number. If a terminal is attached but nobody is logged on it shows No session, and a seat with no terminal assigned shows Empty (grey). |
| Seat key · Default account · Hub | The seat information configured on the server — the default account assigned to that seat and the USB hub the terminal is connected to. |
| Keyboard · Mouse · Terminal | The number of devices currently connected to that seat’s hub. Looking for seats that show 0 before a lesson helps you find missing devices. |
| Notes | A seat with something worth checking is shown in orange with the reason written here — the hub is not connected, two seats point to the same hub, the logged-on account differs from that seat’s account, and so on. |
The top of the window shows the collection time, the number of seats and the number of seats in use. Refresh (F5) collects it again. If “The server is not responding” appears, check that the ClassNori installed on the server is a version that supports this feature.